

🌡️ Shelly Wall Display
Perfect temperature sensor for Better Thermostat.
Better Thermostat is a HACS integration that makes your “dumb” radiator thermostats smart. It uses an external temperature sensor, window sensors and weather data to optimize heating and save energy.
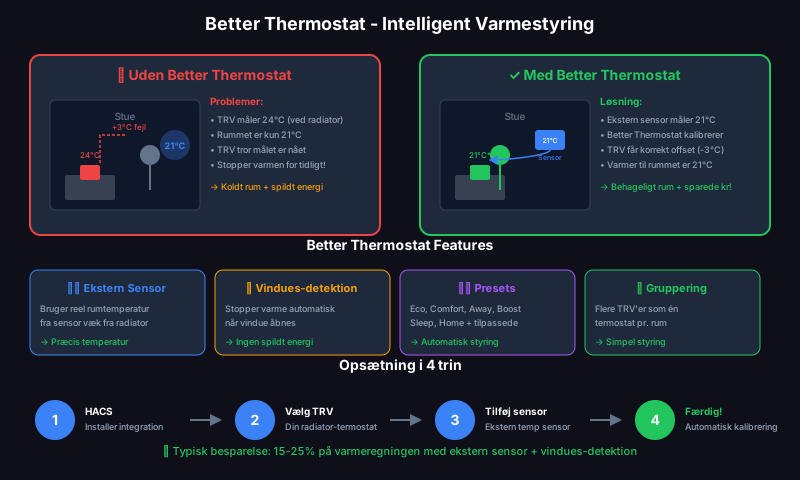
Radiator thermostats (TRVs) measure the temperature right at the radiator - typically 2-5°C warmer than the rest of the room. Better Thermostat solves this:
| Problem | Better Thermostat solution |
|---|---|
| Wrong temperature | Uses an external sensor for the real room temperature |
| Open window = waste | Stops heating automatically when a window opens |
| Manual adjustment | Presets: Eco, Comfort, Away, Boost |
| Multiple radiators | Group TRVs in the same room |
| Calibration | Automatic offset calibration |
| Component | Examples | Required? |
|---|---|---|
| Radiator thermostat (TRV) | Shelly TRV, TRÅDFRI, Sonoff TRVZB, Aqara | ✅ Yes |
| Temperature sensor | Shelly Wall Display, Aqara, IKEA Vindstyrka | ✅ Recommended |
| Window sensor | Aqara, Sonoff, Shelly | ⭐ Optional |
| Home Assistant | With HACS installed | ✅ Yes |
The guide assumes a setup many people already have:
When creating the thermostat you specify:
| Field | Description | Example |
|---|---|---|
| Name | Name of the thermostat | “Living Room Better” |
| Thermostat | Your existing TRV | climate.shelly_trv_living_room |
| Temperature Sensor | External room temperature sensor | sensor.shelly_wall_display_temperature |
| Window Sensor | Window sensor (optional) | binary_sensor.window_living_room |
After creation you can adjust these under Settings → Devices & services → Better Thermostat → Configure:
| Setting | Internal key | Function |
|---|---|---|
| Outdoor Sensor | outdoor_sensor | Outdoor temperature, e.g. sensor.openweathermap_temperature |
| Off Temperature | off_temperature | Outdoor temperature at which heating switches off entirely |
| Window Delay | window_off_delay | Seconds before reacting to an open window (e.g. 30) |
| Window Delay After | window_off_delay_after | Seconds before heating resumes after the window closes |
| Tolerance | tolerance | Allowed deviation before the thermostat regulates |
| Presets | presets | Choose which presets (eco, comfort, away, etc.) are active |
Here is a complete example with a living room that has 2 Shelly TRVs:
climate.shelly_trv_living_room_1climate.shelly_trv_living_room_2sensor.shelly_wall_display_temperaturebinary_sensor.window_living_room (if you have one)After creation you get:
# New climate entityclimate.living_room_heating:  current_temperature: 21.5°C  # From the Wall Display  target_temperature: 21°C  preset_mode: comfort
# Attributeshvac_action: heatingwindow_open: false| Preset | Default temp | Use case |
|---|---|---|
| None | 20°C | Default |
| Eco | 19°C | Energy saving |
| Comfort | 21°C | At home and active |
| Boost | 24°C | Quick heat-up |
| Away | 16°C | Not home |
| Sleep | 18°C | Night |
# Via automation or service callservice: climate.set_temperaturetarget: entity_id: climate.living_room_heatingdata: temperature: 22automation: - alias: "Heating: Away when nobody home" trigger: - platform: state entity_id: group.people_home to: "not_home" for: minutes: 30 action: - service: climate.set_preset_mode target: entity_id: - climate.living_room_heating - climate.bedroom_heating - climate.office_heating data: preset_mode: away
- alias: "Heating: Comfort when home" trigger: - platform: state entity_id: group.people_home to: "home" action: - service: climate.set_preset_mode target: entity_id: - climate.living_room_heating - climate.bedroom_heating data: preset_mode: comfortautomation: - alias: "Heating: Sleep at night" trigger: - platform: time at: "22:30:00" action: - service: climate.set_preset_mode target: entity_id: - climate.living_room_heating - climate.bedroom_heating data: preset_mode: sleep
- alias: "Heating: Comfort in the morning" trigger: - platform: time at: "06:30:00" condition: - condition: state entity_id: group.people_home state: "home" action: - service: climate.set_preset_mode target: entity_id: - climate.living_room_heating - climate.bedroom_heating data: preset_mode: comfortautomation: - alias: "Office: Boost on presence" trigger: - platform: state entity_id: binary_sensor.office_presence to: "on" condition: - condition: numeric_state entity_id: sensor.office_temperature below: 20 action: - service: climate.set_preset_mode target: entity_id: climate.office_heating data: preset_mode: boost # Switch to comfort after 30 min - delay: minutes: 30 - service: climate.set_preset_mode target: entity_id: climate.office_heating data: preset_mode: comfortBetter Thermostat can automatically stop heating when a window opens:
# Configured at creation or via Optionswindow_sensors: binary_sensor.window_living_roomwindow_off_delay: 30 # Wait 30 sec before stopping the heatwindow_off_delay_after: 0 # Resume heating immediately when the window closesBetter Thermostat has no built-in temperature-drop detection. If you lack a physical sensor, you can instead create a virtual window sensor that switches to “on” after a sudden temperature drop:
Install the matching UI card to see extra info:
# Lovelace card configurationtype: custom:better-thermostat-ui-cardentity: climate.living_room_heatingeco_temperature: 19disable_window: falsedisable_summer: falsetype: thermostatentity: climate.living_room_heatingfeatures: - type: climate-preset-modes preset_modes: - eco - comfort - boost - away - sleepBetter Thermostat automatically calibrates your TRV based on the difference between the TRV’s built-in sensor and your external sensor.
Combine with the Energy dashboard:
# Add to configuration.yamltemplate:  - sensor:      - name: "Living Room Heating Status"        state: >          {% if is_state_attr('climate.living_room_heating', 'hvac_action', 'heating') %}            Heating          {% else %}            Idle          {% endif %}
# history_stats measures how long the status sensor has been "Heating" todaysensor: - platform: history_stats name: "Daily Heating Time Living Room" entity_id: sensor.living_room_heating_status state: "Heating" type: time # Result in hours start: "{{ today_at() }}" end: "{{ now() }}"climate.living_room_heating → Shelly TRV x2 + Wall Display tempclimate.bedroom_heating → Shelly TRV + Aqara temp sensorclimate.office_heating → Shelly TRV + LD2410 temp (ESP32)climate.bathroom_heating → Shelly TRV + Wall Display temp# groups.yamlheating_all_rooms: name: "All rooms heating" entities: - climate.living_room_heating - climate.bedroom_heating - climate.office_heating - climate.bathroom_heating🌡️ Shelly Wall Display
Perfect temperature sensor for Better Thermostat.
📊 LD2410 mmWave
Combine presence with heating control.
SmartBolig // AI Core
Get help with troubleshooting, architecture and concrete configuration. I use broad AI knowledge and find SmartBolig guides when they improve the answer.
Start with a useful question