

⚡ First automation
Create your first automation in Home Assistant.
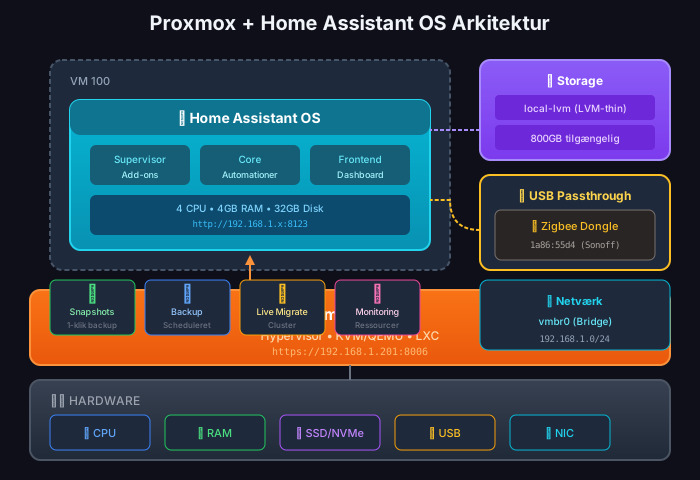
Proxmox is a fantastic platform for running Home Assistant OS. You get full VM isolation, snapshots, backups, and the option to run other services on the same hardware.
| Feature | Proxmox VM | Raspberry Pi | Docker |
|---|---|---|---|
| Snapshots | ✅ One click | ❌ No | ❌ No |
| Live backup | ✅ Yes | ⚠️ Manual | ⚠️ Manual |
| Hardware passthrough | ✅ USB, PCIe | ✅ Direct | ⚠️ Limited |
| Resource scaling | ✅ Easy | ❌ Fixed hardware | ✅ Yes |
| Other VMs/containers | ✅ Unlimited | ❌ No | ✅ Yes |
| Add-ons support | ✅ Full | ✅ Full | ❌ Separate |
The easiest method uses the official community script from community-scripts.github.io/ProxmoxVE.
Log in to the Proxmox shell
SSH to your Proxmox server or use Shell in the web interface:
ssh root@YOUR-PROXMOX-IPRun the installation script
bash -c "$(wget -qLO - https://github.com/community-scripts/ProxmoxVE/raw/main/vm/haos-vm.sh)"Follow the installation wizard
The script will ask about:
100)q35 (modern, better performance)OVMF (UEFI) - required for HAOS32GB, recommended 64GB+2, recommended 44096MB, recommended 4096-8192MBvmbr0)YesWait for the installation
The script downloads the HAOS image and creates the VM. This takes 2-5 minutes.
Find the IP address
Once the VM has started, find its IP via:
# In the Proxmox shellqm guest cmd VMID network-get-interfacesOr check your router’s DHCP list.
If you prefer full control, you can install manually.
Find the latest version
Go to Home Assistant OS releases and find the latest qcow2 file for KVM/Proxmox.
Download to Proxmox
# SSH to Proxmoxcd /var/lib/vz/template/iso/
# Download latest HAOS (replace VERSION with the current one)wget https://github.com/home-assistant/operating-system/releases/download/VERSION/haos_ova-VERSION.qcow2.xz
# Extractxz -d haos_ova-VERSION.qcow2.xz
Create a VM without a disk
# Replace VMID with your desired ID (e.g. 100)qm create VMID \ --name haos \ --memory 4096 \ --cores 2 \ --cpu host \ --bios ovmf \ --machine q35 \ --net0 virtio,bridge=vmbr0 \ --ostype l26 \ --agent 1 \ --onboot 1Add an EFI disk
qm set VMID --efidisk0 local-lvm:1,efitype=4mImport the HAOS disk
# Import qcow2 into the VMqm importdisk VMID /var/lib/vz/template/iso/haos_ova-VERSION.qcow2 local-lvm
# Attach the disk to the VMqm set VMID --scsi0 local-lvm:vm-VMID-disk-1,cache=writethrough,discard=on,ssd=1
# Set boot orderqm set VMID --boot order=scsi0
Start the VM
qm start VMID| Setting | Value | Explanation |
|---|---|---|
| Machine | q35 | Modern chipset, better USB/PCIe |
| BIOS | OVMF (UEFI) | Required for HAOS |
| CPU Type | host | Full CPU support |
| CPU Cores | 2-4 | 2 minimum, 4 recommended |
| RAM | 4096-8192 MB | 4 GB minimum |
| SCSI Controller | VirtIO SCSI | Best disk performance |
| Disk Cache | Write through | Safe, good performance |
| Network | VirtIO | Best network performance |
| QEMU Agent | Enabled | Snapshots, IP display |
agent: 1bios: ovmfboot: order=scsi0cores: 4cpu: hostefidisk0: local-lvm:vm-VMID-disk-0,efitype=4m,size=4Mmachine: q35memory: 4096name: haosnet0: virtio=XX:XX:XX:XX:XX:XX,bridge=vmbr0onboot: 1ostype: l26scsi0: local-lvm:vm-VMID-disk-1,cache=writethrough,discard=on,size=32G,ssd=1scsihw: virtio-scsi-pciTo use USB devices (Zigbee coordinator, Z-Wave stick) in Home Assistant:
Find the USB device ID
# On the Proxmox hostlsusbExample output:
Bus 002 Device 003: ID 1a86:55d4 QinHeng Electronics SONOFF Zigbee 3.0 USB Dongle Plus V2Add it to the VM
# Format: vendor:product (from the lsusb output)qm set VMID --usb0 host=1a86:55d4Or via the web interface:
Restart the VM
qm reboot VMIDIf you run out of space:
Expand in Proxmox
Via the CLI:
qm resize VMID scsi0 +50GOr via the web interface:
Expand in Home Assistant
HAOS expands automatically on the next reboot, or:
Perfect before updates or experiments:
# Create snapshotqm snapshot VMID pre-upgrade --vmstate 1
# Restore snapshotqm rollback VMID pre-upgrade
# Delete snapshotqm delsnapshot VMID pre-upgradeFor disaster recovery:
# Manual backupvzdump VMID --compress zstd --storage local --mode snapshot
# List backupsls /var/lib/vz/dump/
Or schedule automatic backups via Datacenter → Backup in the web interface.
Open Home Assistant
Go to http://HAOS-IP:8123 in your browser.
Create a user
Configure your home
Update everything
Go to Settings → System → Updates and install all available updates.
Home Assistant is updated through the web interface:
⚡ First automation
Create your first automation in Home Assistant.
📡 Zigbee2MQTT
Add Zigbee devices with USB passthrough.
SmartBolig // AI Core
Get help with troubleshooting, architecture and concrete configuration. I use broad AI knowledge and find SmartBolig guides when they improve the answer.
Start with a useful question